Saturday, April 30, 2011

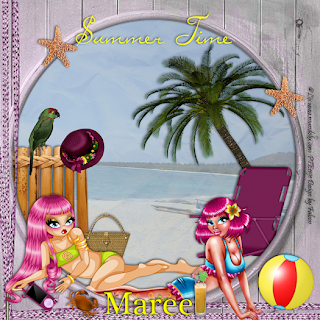
SummerTime ♥


For this Tutorial you will need.

A Tube/s of your choice I am using the awesome artwork of ©Lix ,
which you must have a license to use you can get one at PTE

Elements and Papers are from a scrap kit called Anja by Bea (*Bea Creations*)
you can find it on her blog Here.
Please leave some love...

Font:Plantagenet Cherok
Drop Shadow of choice.

Remember to Save Often!!!

Let's create

Open new image 650 x 650.

Select p11_bc_anja paste as new layer.
Open tree01_bc_anja move to right of layer.
Open chair01_bc_anja reize 75% move to right of layer.
Open deco04_bc_anja move to left of layer.
Open frame09_bc_anja and resize 200%.
Open your tube/s place then with eraser tool remove anything
overhanging the frame.
It's best if you zoom out to give you a larger area wo work with.

Open hat01_bc_anja resize 42% move to edge of fence,
using your Pick Tool to angle slightly.
Open bag01_bc_anja resize 34% move to left of layer.
I add the beach ball from my tube resize to 35% move to right of frame.

Open deco06_bc_anja move to top of frame position then duplicate/Image/mirror.
Open crabe01_bc_anja resize to your liking then position on left of frame.

Open drink01_bc_anja resize 23% move to center of layer.
Open plaer01_bc_anja resize 18% move to left of frame.

Give all a Drop Shadow.

Add your Artist © and your name then crop and save.
This is only a guide and feel free to use any other element you wish.
Most of all have fun creating.

Email me your creation, so I can show off your creations on my blog.
Thank you for using my tutorial.

Written and copyrighted to Maree (aka Falcon) on 30th April 2011.
Under no uncertain terms are you allowed to make money from
anything produced from this tut, this is against my TOU's.

Any similarities to this tutorial are purely coincidental.

Saturday, April 16, 2011

Sweet Life ♥


Supplies Needed

I'm using the artwork of ©PinUpToons, you can purchase tube Here
Scrap kit by Thaliris Designs & Chouk77 called Collab Lovely Poppies Part7 Here
Free-Limited Time.
Font: AbagailJackson
Drop Shadow of choice.
DBV_Mask120 Here
Remember to Save Often!!!

Let's create

Open new image 650 x 650.

Select chouk77_pop07_element 02 copy paste resize 65%
Select thaliris_lovelypoppies_el 16 copy paste resize 15%
Select thaliris_lovelypoppies_el 07 resize 17% move to right of frame.
Select thaliris_lovelypoppies_el 13 resize 11% move to right of frame,
using your Pick tool to straiten the flower.
Select thaliris_lovelypoppies_el 10 resize 10% move to right of el13 then
duplicate/Image/Mirror place on other side of el13.
Select thaliris_lovelypoppies_el 01 resize 19% move to right of frame.
Select chouk77_pop07_element 05 resize 21% move to left of frame.
Select thaliris_lovelypoppies_el 03 resize 12% move to top left of frame.
Select thaliris_lovelypoppies_el 09 resize 8% place on top of el 09.
Select thaliris_lovelypoppies_el 14 resize 15% move to left of layer.
Click on Paint Brush using FG: #83e5ff place a couple of blobs of paint on easel.
Click on Smear brush,just on edge of color push outward to give a smear effect,
do this till you are happy with result.
Select chouk77_pop07_element 07 resize 24% place on center of easel.
Add your tube of choice move to center of layer.
Select chouk77_pop07_element 10 resize 17%/Image/Mirror/ move to the right.
Select chouk77_pop07_element 01 resize 15% move to top left of frame.
Select chouk77_pop07_element 03 resize 14% place top right corner of frame.
Use your Pick tool to angle the element.
Click on Selection Tool draw out rectangle to fit frame, new layer paste into selection,
chouk77_pop07_paper 02/deselect.
New laye/select all copy paste into selection chouk77_pop07_paper 05
apply mask/merge group.
Give all a Drop Shadow.

Add your Artist © and your name then crop and save.
This is only a guide and feel free to use any other element you wish.
Most of all have fun creating.

Email me your creation, so I can show off your creations on my blog.
Thank you for using my tutorial.

Written by © Maree (aka Falcon) on 16th April 2011.
Any similarities to this tutorial are purely coincidental.
Friday, April 8, 2011

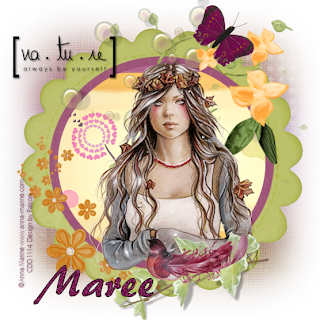
Always Be Yourself ♥


Supplies Needed

I'm using the artwork of © Anna Marine, you can purchase tube Here
Scrap kit by BellisaDesigns called Lovely Poppies Collab kit (6) Here

Be quick as this is Limited TimeFreebie

Font: Brush445 BT
Drop Shadow of choice.
HorsePlays Pasture Mask_11 Here
Remember to Save Often!!!

Let's create

Open new image 650 x 650.
Open SekadaDesigns_lovelypoppies_element 2 resize 68%,then open SekadaDesigns_lovelypoppies_elements16 move to inner edge of frame.

click inside frame with Magic Wand/Select all/Modify/Expand by 4 copy and paste
line_lovelypoppies_papier 04 resize paper 39%(you will pattern beter).Selections/Invert/Delete/move below frame layer.

Open BellisaeDesigns_lovelypoppies_element 3 resize35% move to top right of frame.
Open SekadaDesigns_lovelypoppies_element 07 resize 45% move to top of frame.
Open BellisaeDesigns_lovelypoppies_element 10 resize 35% move to right of frame.
Open your tube resize if needed and paste into frame.
Open SekadaDesigns_lovelypoppies_element 15 resize 24% ove to left of frame.
Open line_lovelypoppies_element 13 resize 39% Image/Mirror/
move to center bottom of frame.
Open BellisaeDesigns_lovelypoppies_element 11 resize 39% move to top right of layer.
Open SekadaDesigns_lovelypoppies_element 4 resize 28% move over the leaves.
Open BelliseaDesigns_lovelypoppies_element 9 resize 19% move to top of layer.
Open BelliseaDesigns_lovelypoppies_element 7 resize 39% move to top left of layer.
New layer select all open SekadaDesigns_lovelypoppies_paper5
paste into selection.Apply mask merge group.

Add your Artist © and your name then crop and save.
This is only a guide and feel free to use any other element you wish.
Most of all have fun creating.

Email me your creation, so I can show off your creations on my blog.
Thank you for using my tutorial.

Written by © Maree (aka Falcon) on 8th April 2011.
Any similarities to this tutorial are purely coincidental.

Sunday, April 3, 2011

Lady Luck ♦


Supplies Needed

I'm using the artwork of© Cane Hoyer , you can purchase his tubes Here
Scrap kit by Kim's Korner called Waking Up In Vegas FTU Here
Font: Of Choice
Drop Shadow of choice.
HorsePlays Pasture mask_11 Here
Remember to Save Often!!!

Let's create

Open new image 650 x 650.
Background #ffffff and Foreground #000000
Using your Preset Tools draw out a rectangle not to large.
Click on out white area with Magic Wand/Adjust.Add Noise Uniform 10.
Duplicate layer.
On first layer click black area copy paste your tube/Layers/Merge down.
Repeat with the frame layer 2.
Add your main tube between the frames.
Open kk_WUIV_Freebie_cards duplicate/Image/Mirror,move them around
till your happy with placement.
Open kk_WUIV_Freebie_Wordart01 resize 65% move to center of layer.
Open kk_WUIV_Freebie_Bling-Star resize 45% duplicate and place on either side of frames/layers/merge down.
Open kk_WUIV_Freebie_Paper03/ new layer/selections/select all paste into selection/deselect.
Apply the mask then apply Graphic Plus-Tinted Glass with these settings:


If you wish to Animate the stars please continue.
Add your Artist © and your name then crop and save.
This is only a guide and feel free to use any other element you wish.
Most of all have fun creating.

Animation Shop

Open Animation shop then click back into Psp.
1.Click on star layer/Adjust/Add Noise/Uniform-30/click in AS paste as new animation.
2.Click back to Psp click Undo then repeat above using 35 then in As- paste
after current frame.
3.Click on undo then Repeat above using 40 again past after current frame.
Check your animation and if you are happy then Save as a Gif.


Email me your creation, so I can show off your creations on my blog.
Thank you for using my tutorial.

Written by © Maree (aka Falcon) on 3rd April 2011
Any similarities to this tutorial are purely coincidental